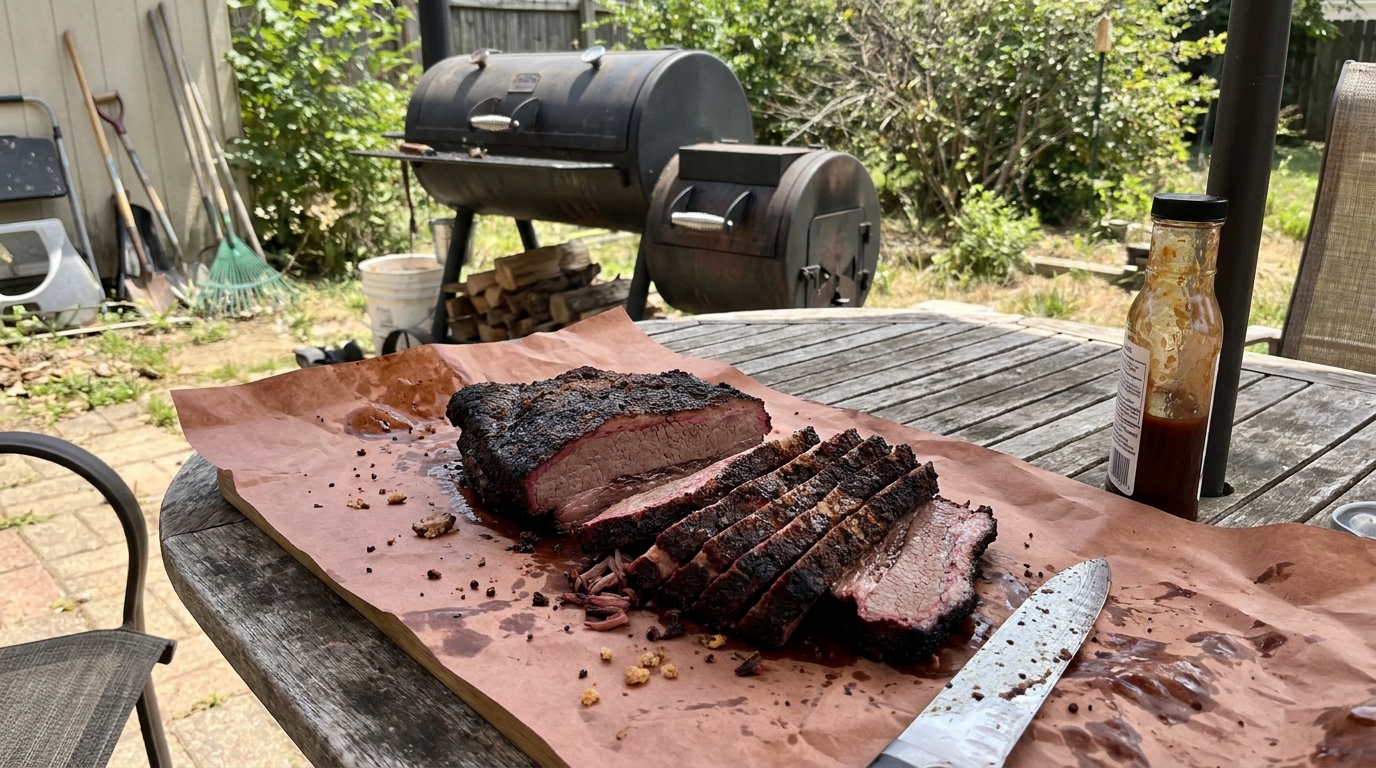
How to Slice a Packer Brisket Against the Grain
Big B’s Quick Hits (TL;DR)
- Rest First: Leave the knife in the block until the packer has rested. Juice stays in the meat, not on the board.
- Read the Grain: Fibers on the flat run one way; the point runs another. Look before the first cut.
- Rotate at the Junction: When the grain turns, turn the brisket or the knife. Same-direction slicing wrecks the point.
- Pencil-Thick: Aim for about a pencil’s width on the flat. Slightly thicker on the point is fine.
- Never Slice Hot: A screaming-hot packer dumps juice and shreds bark. Wait it out.
Guests eat the slice, not the cook. You can run a clean fire for twelve hours, hit probe-tender in the thick flat, and still serve chewy plates if you cut with the grain. A whole packer brisket is two muscles stacked together, and those fibers do not run the same direction. The board work is the last job that decides whether all that low-and-slow time actually lands on the plate.
This is not another walkthrough of the cook. If you need the full method, start with brisket 101. What follows is what happens after the rest: how to find the grain, slice the flat, rotate at the junction, and keep bark on every piece so nobody gets the dry end while someone else gets all the point.
Rest First, Then Read the Grain
A probe-tender packer still needs time on the counter before it meets a knife. While the meat sits wrapped, juices that got shoved toward the center during the cook move back through the muscle, and the bark firms up enough that a long blade will not tear it into flakes. Slice it screaming hot and you get a pink puddle on the board and a dry flat in the sandwich. The full rest-and-hold playbook lives in how to rest and hold brisket. For board work, the rule is simple: wait until the packer is warm and relaxed, not still pumping heat.
Once it is ready to slice, set the whole packer on butcher paper or a large board with the fat cap facing up so you can see both muscles. The lean flat is the long, thinner slab. The point is the thicker, fattier cap sitting on top toward the thick end. Before you make a single cut, look at the surface and find the grain. Those lines are muscle fibers running in a direction, the same way wood grain runs in a board. On the flat they usually travel lengthwise, from the thin end toward the thick end. On the point they run at an angle, often close to perpendicular to the flat.
Take ten seconds and actually trace it with a fingertip. If the fibers are hard to see under bark, look at a cut face or a thin edge where the trim exposed the meat. You can also nick a tiny corner off the thin end of the flat and look at the exposed fibers head-on. That little test cut tells you which way to send the knife for the rest of the flat. Do this before you commit. Once you start carving long slices, it is awkward to stop and reorient a 12-pound packer with juice running everywhere.
The grain is not a suggestion. Cut parallel to those fibers and you leave long, intact strands that chew like beef jerky no matter how well the collagen rendered. Cut across them and you shorten those strands into tender bites that fall apart on the fork. That is the whole job of slicing against the grain. Find it on the flat first, remember that the point will disagree, and only then pick up the knife.
Slicing the Flat
Start at the thin end of the flat, the tapered nose that cooked the fastest. That end is your practice run: if the grain looks wrong on the first slice, you can still turn the packer before you chew through the thick, juicy middle. Set a long, sharp slicing knife perpendicular to the fibers you traced. You want the blade crossing those lines, not riding along them. If you trimmed the packer with a quarter-inch fat cap still on, leave that fat attached to each slice. It bastes the lean as it hits the plate, and guests who do not want it can push it aside. Guests who get a naked, dry edge cannot put the fat back.
Thickness is a pencil, not a steak. Aim for about the width of a wooden pencil, roughly a quarter inch. Thinner than that and the slice falls apart before it reaches the bun. Thicker than that and you are chewing across too much fiber at once, even if you cut against the grain. Use long, smooth strokes from heel to tip. Do not saw. A sawing motion shreds bark into black crumbs and leaves ragged edges that dry out in two minutes on the board. Let the knife’s length do the work. If the blade is dragging or tearing, it is dull. Stop and hone it rather than muscling through a $80 packer.
Keep a little moisture on the cut face as you go. If the board is dry and the meat is starting to look matte, you waited too long after unwrapping, or the room is blasting AC onto the brisket. Work in batches: slice what you need for the first round of plates, then tent the remaining unsliced packer with foil so it stays warm. A whole packer sliced all at once looks impressive for about four minutes, then the lean edges start to crust over. Serve from the middle of the flat as soon as you have a stack, and save the very thinnest nose pieces to mix into later plates so nobody is stuck with only the driest bites.
Watch the color and feel as you move toward the thick end. A well-rendered flat should show a smoke ring under dark bark, a moist cut face, and fat that looks translucent rather than waxy white. If a slice bends and then breaks cleanly instead of stretching into strings, you are on the grain. If it looks like a comb of long fibers running the length of the slice, stop. You drifted parallel to the grain. Rotate the packer a few degrees and recut. That mid-course correction is cheaper than serving a tray of chewy beef.
The Junction: Where the Grain Turns
Keep slicing the flat until you hit the junction, the thick seam where the point sits on top of the remaining flat. You will feel it before you see it: the knife starts pushing through a second muscle, the fat layer between them gets wider, and the grain on the cut face no longer matches the lines you followed from the thin end. That deckle fat is the tell. Once you are cutting through two grain directions at once, stop. Everything past this point needs a new plan.
You have two honest options. The first is to separate the point from the remaining flat. Slide the knife along the fat seam and lift the point off as one piece. Then you can finish the leftover flat against its original grain, and handle the point on its own board with a fresh read of the fibers. The second option is to leave the packer whole, rotate the whole thing about 90 degrees, and start slicing the point against its grain. Both work. What does not work is charging straight through with the same stroke you used on the nose. That is how you turn a perfectly rendered point into long, chewy ribbons.
Look at the point’s surface before you commit. The fibers usually run across the packer, closer to side-to-side than end-to-end. If you are unsure, make one test slice, look at the cut face, and check whether the fibers are short cross-sections or long strands. Short cross-sections mean you are against the grain. Long strands mean rotate again. The junction is the most common place backyard cooks lose the plot, because the brisket still looks like one roast and the muscle change is hiding under bark.
Big B’s Take: I separate the point when I want clean slices of both muscles, or when burnt ends are on the menu. I leave it attached and rotate when I am feeding a crowd and I want every plate to get a mix of lean and fatty from the same stack. Either way, I never keep the knife traveling the same direction through the whole packer. The grain turns. Your board work has to turn with it.
Slicing the Point
The point is a different eat. More intramuscular fat, a thicker bark, and a looser grain that can handle a slightly thicker slice without turning chewy. Once you have rotated or separated, cut against the point’s grain at about a third of an inch, a little fatter than the pencil-thick flat slices. Those extra millimeters give the rendered fat room to shine and keep the slice from collapsing into shreds. You still want a clean, long stroke. The point’s bark is often the darkest, crunchiest crust on the packer, and sawing it off is a waste of the hours you spent setting it.
Leave the fat on. Point slices should show a mosaic of lean and rendered fat, not a trimmed-down steak. If a pocket of hard, waxy fat survived the cook, you can trim that one blob after slicing. Do not preemptively peel the whole point down to lean. That fat is the reason people hover by the cutting board. Mix point slices into the same tray as the flat so every guest gets some of both. Serving all the lean first and holding the point “for later” is how the last plates get dry and the first plates get jealous.
If burnt ends are the plan, stop slicing the point into sandwich strips. Cube it instead. Cut the separated point into roughly 1-inch chunks, toss them with a little of the drippings or a thin glaze, and finish them as burnt ends at home. That is the only time I treat the point as a separate project instead of sliced brisket. Do not cube a point that you already sliced thin against the grain. You will end up with ragged scraps that dry out in the pan. Decide before the first cut: slices for the tray, or cubes for burnt ends.
Work the point while it is still warm. Rendered fat that cools on the board turns sticky and dull. If you separated the muscles, slice the remaining flat first (it dries faster), then move to the point. Keep the unsliced point tented until you need it. When a point slice bends and the fat looks glossy rather than chalky, you are in the sweet spot. If it crumbles, you went too thin. If it chews with long fibers, you missed the grain again. One correction slice is all it takes to get back on track.
Common Slicing Mistakes
The classic miss is cutting with the grain. It happens when you treat the packer like a loaf of bread and slice straight across from one short end to the other without looking at the fibers. Those long strands survive even a perfect cook. If a slice looks like a comb, you are parallel to the grain. Stop, rotate, and recut. The second classic miss is going too thick. Half-inch “steak” slices of flat chew like roast beef, not Texas barbecue. Pencil-thick on the flat is not a style preference. It is how you shorten the remaining fiber so a well-rendered packer actually eats tender.
Slicing hot is the mistake that looks like success for thirty seconds. Juice floods the board, bark slides off in sheets, and the remaining meat dries as it sits in the puddle. If the packer is still too hot to handle comfortably with gloves, it is too hot to slice. A dull knife is the quiet killer. It tears bark, compresses the slice, and makes you saw. Hone before you start. If you have to press down hard, you are fighting the blade, not the brisket.
Do not serve the dry nose first and save the point as a prize. Mix lean and fatty on the same tray from the first plate. Guests who only get the thin end will think the cook failed, even if the middle of the flat is perfect. The same goes for slicing the entire packer at once for a photo and then letting it sit. Slice what you need, tent the rest, and keep the unsliced meat warm. Board work is part of the cook, not a victory lap after it.
If the brisket itself was undercooked, no knife trick will save it. A tight, rubbery flat that fights the blade was not probe-tender when it came off the pit, and slicing thinner will only give you thin chewy slices. That is a cook problem, covered in brisket 101, not a slicing problem. Board work assumes the collagen already rendered. Your job here is to not undo that work.
Keep the fire steady and the drinks cold. I’ll see you at the pit. - Big B
Keep the Fire Burning
Fat Cap Up or Down on Brisket? A Backyard Offset Answer
Skip the forum dogma. On a backyard offset, fat-cap orientation follows heat direction and a ¼-inch trim — not a one-size internet rule.
Read GuideWhen to Wrap a Brisket: The Pitmaster's Timing & Decision Guide
Stop wrapping by the clock. Learn how bark formation, fat render, and temperature cues tell you the exact moment to wrap your packer brisket.
Read GuideSpritz vs. Mop on Beef: Moisture, Bark, and Timing Guide
Should you spray apple cider vinegar or brush on a rich mop sauce? Learn how spritzing and mopping affect bark, temperature, and flavor on smoked beef.
Read Guide